Saturday, February 26, 2011

The Beauties

I thought I'd share with you the beauties that I get to perform with on a regular basis.   Lucky me!!


Curtain call at the Uptown on Feb 21st 2011


Bombshell Betty and her Bulesqueteers performing at the DNA Lounge, last year.


Intermission at the Elbo Room on Feb 8th 2011

Tuesday, February 22, 2011

Lily St. Cyr

Besides performing and costuming I've been reading and learning about the history and performers of burlesque. I hope to share with you on occation some ladies that inspire me.

Lily St. Cyr, Gilded Lily as they called her was simply stunning. This burlesque super star was doing her thing tempting and teasing in the 1950's. I can only imagine how she looked on stage, a sultry beauty with insanely amazing legs! From her pictures I think she was pure sex with class and knew how to have
fun.

 I don't know much about Miss. Lily only a few things I read online about her. For example; she was friends with Marilyn Monroe and Marilyn based her image after Lily. I get inspiration for myself from Marilyn, so I thought I would look into who this Lily St. Cyr is.  I found a book on amazon about her today, its coming in the mail and I can't wait to read it.


What I love about her in this video is her playfulness, how sexy she is, and how classy she looks. She is not over the top, she is not vulgar in anyway.


 Looking at these photos, I have learned a lot and have been inspired about posing, teasing, and costumes. I hope you get something from them too.

I think it's important as a performer to look into the past of your art and learn from the performers who came before you and paved your way.

xoxo
Dangerous Delilah

Friday, February 18, 2011

Man Props.

Man what?  Man Prop! Oh how we love them. A nice big hunk of a man up on stage with you is great fun. You can do all kinds fun things with a man as a prop.


And oh what fun you can have. You can tease them, tie them, take their cloths off, let them have the honor of taking your cloths off. You can spank them, sit on them, and make them beg for you. Like I said, oh what fun!!

But there are rules when it comes to man props. First of all the man prop is NOT a performer, he is a prop. So, get him up on stage with you, use him, abuse him and get him back in the audience.

Next, the man prop can not. CAN NOT come in the dressing room with out you. Also, he must be announced that a man is coming in the dressing room. The dressing room is a place to get ready, to preen, to focus and at the very basic it is a place to dress and undress. Not a place for a random man (the man prop) So, when it is announced by you that your man prop is coming in, please let the ladies voice their opinion. Usually there will be an "alright come on in" or a "in just a minuet." This must be respected.

Also, if a man prop has been allowed access once to the dressing room, that does not give him access for the rest of the night. Every time he needs to come in he must yet again be announced. 

A man prop must not be hanging out in the dressing room, he must be in, on stage, and out. No loitering! The women back stage don't want someone in their way that doesn't need to be there and they certainly don't want to be stared at. 

 Man props are so so so much fun. They bring a whole new aspect to you dance. Let's bring on the men!
Follow these super simple and respectful rules and everyone will be happy and if you don't follow them you may lead me to blog about it ;)

xoxo
Dangerous Delilah

Tuesday, February 15, 2011

How to Make Feather Fans

I love fan dancing, but I don't love the cost of the stunning, amazing, fluffy cloud-like, ostrich fans. So I decided to make some myself. They turned out beautifully, I could not be happier! Here is a step-by-step, a how to guide.

Materials needed: Cardboard, ostrich feathers, hot glue gun. Yup, that's it!


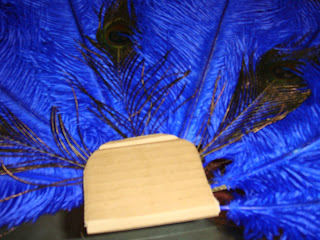
Step 1: The cardboard is going to be your handle and what holds the feathers in place. Cut the cardboard into the size and shape you want. Remember though, in this design the cardboard will be folded in half, so whatever shape you choose will need to match it on the other side and do not cut the cardboard in half. I chose a rectangle with rounded corners. Simple! 


Step 2: Lay the feathers out on 1 side of the cardboard, in the order or pattern you want. You can use different colored feather and alternate them, get creative. I already have so many more ideas for new fans!


Step 3: Glue, glue, glue. Glue the feathers down into the cardboard to make sure they are nice and secure. I left all the feathers in place and glued them one by one.


Step 4: Fold the other half of the cardboard over the ends. I then put the glue gun tip in between the feathers and squirted some glue to seal the areas closed.
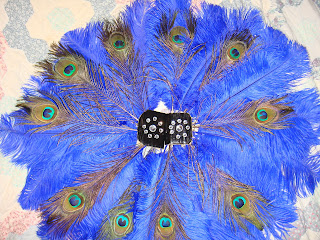
Step 5: Decorate the handle. I painted my black (with nail polish) and hot glued crystals in a simple design. I actually recommend painting the inside cardboard too before you lay the feathers down. I think it will make it look more polished. I didn't realise this until I was done. Again, get creative here, used fabric or stencil, different colors, monogram them!


Step 6: Enjoy!


This is such a cost effective way to make very custom beautiful feather fans. You can use any kind of feathers, design, colors, there are so many possibilities. These look beautiful in pictures and on stage.
Have fun!!!!!

xoxo
Dangerous Delilah
Sunday, February 6, 2011

Small Fun Things

I have been quite a busy bee with a new show venue on Jan 29th at Cellspace, my very first photo shoot with an amazing photographer, making new feather fans, sparkelizing a beautiful corset, making a new act and performing in Blazing Burlesque in Sacramento and all of this in about a week. Wheeew! I took a looong nap today.

I got a new pink corset that I wanted to make extra special. So I went the craft store to find some things to bedazzel it and I decided to get a new little dedazzeling tool.  I had seen it a few times in the store, but it is a little pricey and the crystals that you have to use with it are too.  I didn't want to hot glue the corset and I wanted a sharper look that sequins. So what did I get?...
I got a little heating tool called Glam-it- up, by Tulip.  The tip of the tool gets really hot. You place a crystal where you want it, then put the hot wand thing on the top of the crystal, it heats the glass crystal and melts the glue that is on the bottom of the crystal. Voila! Beautiful crystal covered corset with no glue gun goopy glue.


Special glue bottom crystals

So pretty & sparkly!
 I am very happy with the result and hope to use this in an act soon!

xoxo

Dangerous Delilah